CLICK HERE FOR FREE BLOGGER TEMPLATES, LINK BUTTONS AND MORE! »

Saturday, September 25, 2010

The Last of the Tomatoes

With Fall officially here my tomatoes are pretty much spent and I should be able to find some other interesting things to post on instead, so this is one last tomato post to wrap things up...


Previous Posts:
Heirloom Tomatoes (again!)
Planting (Potting) Heirloom Tomatoes
Quick Tomato Update
Tomatoes, Tomatoes, Tomatoes

All in all I am pleased with the endeavor. I will be fertilizing from the start next year as well as closely monitoring water throughout the growing season and I have decided on my favorites from the five varieties I grew this year and plan to grow them all again next year except for the striped roman.

Here's the breakdown of my experience with each variety:

Pantano Romanesco
Great sandwich/burger "slicer" tomato.  Clean, mild flavor that goes well with any sandwich type of thing. This was also my most successful tomato as it did not succumb to the blossom end rot that others did and produced plenty of good sized fruits.  I had two plants this year and it produced just enough for my family of four.

Striped Roman
This did have several fruits that gave in to the blossom end rot and did not produce very well particularly considering that you really need a decent amount of these to do anything with them.  It is a paste tomato that I had read others say they ate these with their other table tomatoes, but this was not my experience.  I did not care for the flavor as it was at all.  I may have made sauce or paste from them had I had more fruits to work with.

Weeping Charlie - note, I have just discovered that the "unknown tomato" in my pot this year may have actually been the weeping charlie and the little cherry tomatoes I assumed were what I had ordered since they showed up on the vine first are actually "unknown" sneaky guys that got in with my order.  I am going to have to track down the actual variety from Horticopia because I enjoyed the little cherries, made all my post descriptions based on them and didn't end up with much from the actual weeping charlies....
Very acidic great tasting little cherry tomato (see note, weeping charlies are actually a roma type tomato).  I really like these and got plenty of them at a time to add to salads early in the season. As the season went on only one or two would ripen at a time so my son just ate those off the plant as that was a serving he was fine with.  They are also small enough that they were not affected by the blossom end rot that the others experienced. -

Depp's Pink Firefly
This is a great beefsteak tomato that ended up being delicious in salsa.  The funny thing about my experience was that I only ended up with two fruits off the one plant I had and they took almost the whole season to grow and ripen.  I tell you what though, they were huge!  I made one large batch of salsa from each tomato.

Purple Russian
My Favorite.  Great little oblong 6 ouncers that I most enjoyed eating fresh off the plant.  It has a great sweetness to it that I thoroughly enjoyed and ended up making a great caprese salad (was delicious on a regular ol' salad as well).

So here's some pictures of what I did with them and the one last issue I had that truly ended the season for me.

What I thought were Weeping Charlie tomatoes, on a salad

(Top) Pantano Romanesco ready for sandwiches
(bottom) Purple Russian ready for most anything

Caprese with pesto

I didn't get a picture of the salsa or the fully ripe Depp's but here's the recipe I used, modified from a friend:


Salsa
4 tomatoes
1 white onion
3 cloves of garlic, minced
1/3 cup fresh cilantro (more or less to your taste)
1 can tomato sauce (I used crushed tomatoes [14.5oz] and you could always just dice fresh tomatoes and put them in the food processor)
1Tbs cumin
1Tbs sugar
3 Tbs white vinegar (I used white wine vinegar)
2 Tbs Worcestershire sauce
2 JalapeƱo peppers, minced
salt to taste

Chop, mix and enjoy!
(I usually put the jalapenos, onion, and garlic in my food processor to make it faster)

When I made it I halved the original recipe to yield about 2 cups which was just enough for game night at our house with 6 adults


And, sadly, I finally gave into the end of the season when the last fruits ended up with Cloudy Spot.  We have been overrun with stink bugs this year and I never knew they were a problem for tomatoes, but they apparently pierce the skin suck out the juices and inject something that kills the flesh at the bite site and leaves you with  cloudy white spots in the flesh just under the skin
Purple Russians with cloudy spot and cracking from inconsistent moisture


oh, and one last issue that I almost forgot to include

Freaky looking thing that ate a ton of the leaves off my plants, didn't seem to cause much issue, but they did leave droppings all over my deck around the tomato pots.  Every one I could find found a nice new home in the woods behind my house, away from my tomatoes. 
I did find that I should have left the ones that looked like this:
Because the little cocoons are not actually more hornworms, but a wasp larvae that have been laid on the worm and when they hatch are predators of the worm.  I was afraid these were tons more worms that were going to overtake my tomatoes when they would have actually served as a natural control for the worms.


Monday, August 9, 2010

Tomatoes, Tomatoes, Tomatoes

Previous Tomato Posts:
Heirloom Tomatoes (Again!)
Planting (Potting) Heirloom Tomatoes
Quick Tomato Update


It has been far to long since I updated you all on the heirloom tomatoes.  They have really taken off!  Here's a quick review:
When I left you last my little plants looked like this
June 14th 2010

Then we went to the beach and when we returned they had survived well without us and they looked like this
June 30th 2010

Now...they don't all fit in one picture!


They're 5-6 ft tall each and full of ripening fruit

Purple Russian on the vine and in my hand to give some scale.

Depp's Pink Firefly

Weeping Charlie

If you'll notice in top near center of the bottom Weeping Charlie photo there is a mystery tomato.  When I got the seedlings the Weeping Charlie had two main stems growing out of it's little cell and at the time I assumed they were both Weeping Charlie, as the fruits have started to set, however, this is clearly not the case.  Not sure what they'll turn out to be, but it does add to the great variety.

Striped Roman

Pantano Romanesco

The vines really took of and caught me off guard, I ended up having to add in new, taller stakes and really dig in through the leaves and vines to tie them up well.  I used Vlecro brand plant ties and am very happy with them.  They are gentle on the vines, but hold them securely.  The other thing that I did to try and control them a bit was to prune off most of the suckers. Yes, they are really called suckers, the new little growths that shoot out between a main stem and an existing branch.  If you catch them early you can just pinch them off with your fingers and if you leave them they will become their own new main stem.  I left two to three main stems near the bottom and enough through the middle of the plant to allow for a decent crop, but to keep the plant able to concentrate more energy on those fruits. In other words, I wanted enough to have several fruits, but not so many that as they plant divided it's energy, the fruits would become smaller.

A few of the fruits did also succumb to blossom end rot. dark soft spots at the blossom end of the fruit.  This can happen when there is not enough calcium in the soil or when the plant is not able to get enough calcium from the soil because of lack of or inconsistent water.  I think in my case it was possibly a combination of both these issues.  I added a tomato fertilizer and have been more diligent with consistent watering and these steps seem to have headed off further issues.


I have so far harvested only Weeping Charlie tomatoes (and have since discovered that they are not Weeping Charlies - see here) as they are the only ones that have ripened fully and I have found they make a great salad tomato and my husband agrees.


delicious!

Monday, June 14, 2010

Bindae duk (...who did what?)

Korean Mung Bean Pancakes (Bindae duk)

In perusing Epicurious for some appetizer ideas for a Memorial day barbeque I was going to I came accross a recipe for Korean Pancakes.  I really enjoy an excuse to go to the international grocery store, particularly a Korean excuse, but I wasn't entirely satisfied with this particular recipe so I searched around a bit before heading off to Grand Mart.  I came across this post, International House of Pancakes from A Beautiful Mosaic, a great blog that I have quickly become a fan of largely because she shared some secrets on how to eliminate cookie spread, you know when they spread out and become as she puts it "crepe-like" and more crisp instead of staying thick and chewy like a good cookie should, I really get frustrated when that happens (the cookies still get eaten, but I am frustrated all the same). Anyhow...her post on bindae duk really is thorough and helpful and I only varied slightly so I'll just insert my photos here (though she also has really great photos...) and some brief explanations.


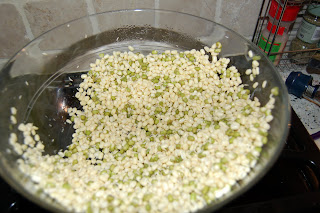
I actually got ahead of myself and bought mung beans at Whole Foods before I had a chance to go to Grand Mart so I ended up with green mung beans instead of yellow because that's all they had.  The difference is that the green ones have not yet been shelled. The A Beautiful Mosaic post actually calls for the green ones, but I will say, don't do it.  I soaked them overnight and supposedly that should have expanded them enough that the shells would come off and float to the top.  They did expand quite a bit, but most of the shells stayed on and needed to be individually removed or rubbed together to come off and even then they did not "float to the top so much as sort of separate a bit when I swirled the water around.  Point being, if you go the way of the green bean, expect a lot of tedious work ahead.  When next I make bindae duk I now have a bag of shelled (yellow) mung beans from the international grocery that I will use.  I finally gave up and left several shells on and really it didn't make a difference that I or my husband (who ate most of them, he loves spicy food, particularly spicy Korean food) could tell.

Kimchi!

 
All together now, with some garlic and scallions which I figured most people knew well enough to omit individual photos (though I will note that I used only the white and light green parts of the scallions). Isn't it pretty?

Add the processed mung beans
and Sesame Oil, just love the smell of pure sesame...can you smell it?
And the result is not a particularly appetizing bowl of thick mush, but if you know what's to come it is promising all the same. (note: you can add pork or other meat if you like and also a couple eggs if you want the batter to be lighter, but if you omit all of these, as I did, you still have a hearty pancake full of protein from the mung beans [1g per 1oz] and it's even vegan)
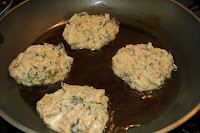
A couple minutes on each side in the pan and we're ready for sauce

That's it, that's the sauce in a picture.  A little of this a little of that, do what you like and add a little spice, or in my case a lot of spice because again, my husband likes spicy Korean food.

In case you can't pick it all out from the picture it's the sauce from the Epicurious Korean Pancake recipe:
For dipping sauce
3 tablespoons soy sauce
2 teaspoons rice vinegar (not seasoned)
1 tablespoon sesame seeds, toasted
1/4 teaspoon dried hot red pepper flakes
1/4 teaspoon Asian sesame oil
Just stir it all together and dip...yum
this sauce would be good for any number of things really

Quick Tomato Update

Newly planted  5/27/10


One week later  6/3/10


Week 2 1/2 Today 6/14/10


Original Posts:


Friday, June 4, 2010

Planting (Potting) Heirloom Tomatoes

Start here for the whole adventure in Heirloom Tomatoes from Etsy - Heirloom Tomatoes (again)!

While I was researching seed starting (if you haven't heard, it didn't work for me this time) I came across some sites that said it would be helpful to plant your tomatoes with broken eggshells to prevent blossom end rot, now I don't know what that is, but it sure sounded like something I didn't want my plants to get so I went ahead and checked with Shana at Horticopia (through an Etsy convo - like email for etsy) to see what she thought about that:

Me:  it has been recommended to me that I plant them with broken eggshells to help prevent blossom end rot, is there any merit in this? Any particularly helpful general suggestions you have to help these little guys succeed? Thanks again.
Shana: Regarding Egg Shells: If you have them & want to use them go ahead. What the plants need is calcium (to prevent blossom end rot). If you add a good organic Tomato fertilizer when you plant, it should contain enough calcium to serve the plants.
Regarding Planting: When you plant, Dig your hole deep, but not too wide. Leaving the tip & ONE (1) set of leaves bellow [the tip], CAREFULLY cut the remaining leaves off. Bury the plant up to the lower set of leaves. The tomato is unique in its ability to generate root all along the buried stem. More Roots = Hardier Plant !!
I hope this answers your questions :) Shanna

Again, I was glad I gave this buying tomoatoes off etsy thing a try (specifically buying them from Shana/Horticopia).  She had come through on her promise to continually support in the planting and growing process and I felt more confident armed with her advice.  I had read about the trimming leaves on other sites, but I'm not sure I would have attempted it without Shana's reccomendation of it as well.  That's what Etsy's about, you get to feel like you know the people you are doing business with and a trust is formed.
Off the Etsy soap box and back to the tomatoes, sorry.

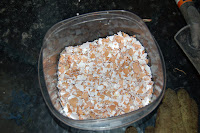
So here are my eggshells plus some fertilizer


plus some soil of course

Mix it all together and you get this lovely fertile pot ready to nourish and sustain yummy tomatoes!


I trimmed all but one set of leaves off each plant (well, I may have left more than one set on some of the plants where they had already started to branch off) and carefully nestled them into their new homes.

(you may need to click on the picture for a better view of these little guys)
5/28/10

A week later and they're growing!

6/3/10
Yes I know, I thought my seedlings were growing too and they all died off and it was terribly sad, but these really do look healthy and one even has a lovely little yellow bud.  So while I will not know the ultimate fate of this tomato attempt for several months, I am at this moment encouraged and hopeful :)

Heirloom Tomatoes (Again!)

I AM going to have fresh Heirloom tomatoes that I picked from the pots on my very own deck, one way or another...

So after my failed attempt at growing heirloom tomatoes from seed I was greatly encouraged when I discovered this wonderful Etsy shop, Horticopia.  They have a great variety of "Exotic and Heirloom Botanica."  I decided to go for the "ORGANIC Tomato Starts- INSTANT HEIRLOOM TOMATO GARDEN Create your own custom 6-pak" found in the Organic Edibles section of the shop.  The choices are incredibly numerous (at the time I bought they had 25 slicer varieties, 8 romas, 12 cherry varieties, though I think they have now sold out of several of the cherries).  I went for:
2 Pantano Romanesco
1 Purple Russian
1 Depps Pink Firefly
1 Striper Roman
1 Weeping Charley
These sounded like ones my family would enjoy and they were available right away (I believe that all of the varieties are now available to ship right away, I think they were just waiting for some of the varieties to mature a bit more and then allowing time to harden them off before shipping them out to people).

I wasn't entirely sure about the condition they would arrive in being shipped literally from coast to coast (Brisbane, CA to Reston, VA), but I was reassured by all the positive reviews they had from buyers, the promise of continued support for growing tips and advice and the prices were reasonable so I went for it.  I am glad I did :)


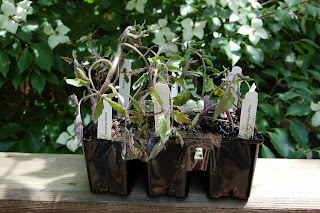
The unassuming package left on my doorstep and a first look inside


Under the newspaper, shredded paper packed around the fragile plants and all wrapped in a plastic bag. The soil was still moist and the plants looked like they'd had a smooth ride the whole way.


Now let's plant these babies...